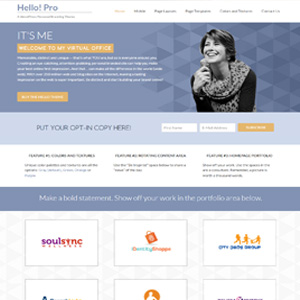
Here at brandiD, we frequently get compliments on the styling of our horizontal opt-in areas. These are the call-to-action areas that we build, usually under the opening website banner on the homepage or in the footer of every page on a website. It’s a nice way to provide a sign-up form without taking up a lot of space, but almost none of the mailing list services provide this kind of styling out of the box. It is possible to use a combination of HTML and CSS tricks to manipulate the form embed code into this layout, but as a lot of plugins also provide form styles, there can be conflicts, and method for each newsletter service is different.

We recently released the Hello! Pro theme which now includes this feature, and works with the Genesis eNews Extended plugin, meaning that you can use this same system for a variety of services (Feedburner, MailChimp, Aweber, FeedBlitz, Constant Contact and more). Hello! Pro already has this code and is ready to use, but the following tutorial will work with other Genesis child themes and the eNews plugin.

Step 1 – Install Your Genesis Parent and Child Themes and the Genesis eNews Extended Plugins according to their documentation.
Step 2 – Connect the eNews plugin to your subscription service (directions can be found on the plugin site) and put the widget into the widget area that you wish to style.
Step 3 – Enter your give away text (PUT YOUR OPT-IN COPY HERE!) in the field that says “Text To Show Before Form:”
Step 4 – Add this CSS code to your style.css. This code assumes a widget area called “home-cta” change the CSS class to match the name of the widget area in your child theme. It should be a full-width widget area in order for this to work.
Also note that there are media queries included in this CSS to style the mobile versions so you may want to adjust these according to the “break points” of your specific child theme.


